
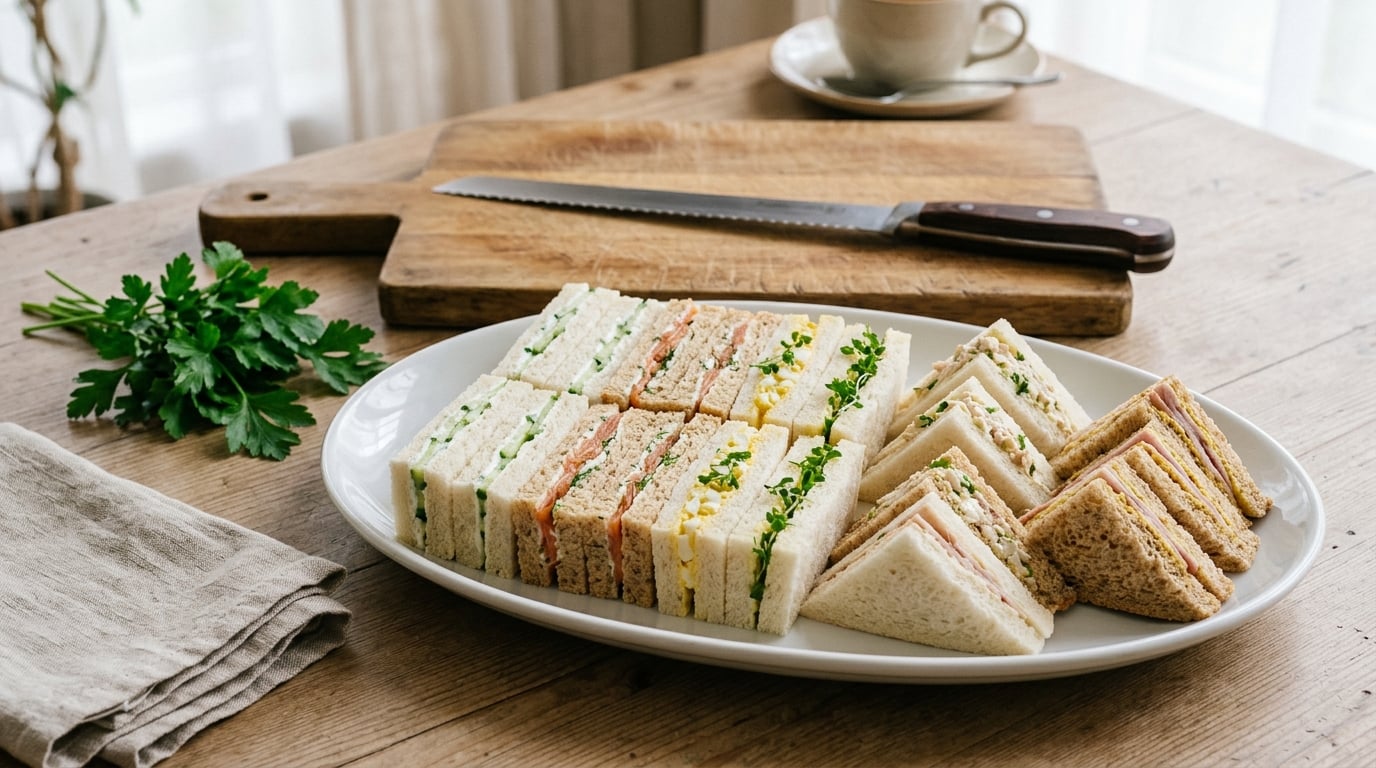
How to cut a sandwich for a platter so it looks professional comes down to four things: chill it first, square off the bread, mark even portions before you start, and saw gently with a sharp serrated knife instead of pressing down. Matching pieces, clean edges, and a cut shape that suits the occasion are what turn a homemade pile into a styled platter.
The whole job takes about 15 minutes for a batch of six sandwiches, and it needs nothing more advanced than a decent knife and a board. Last updated October 2026.
Searchers keep asking for photos of a finished layout rather than cutting instructions, which tells me the arrangement matters as much as the cut. So the steps below cover both, and you can stop after the cutting if the platter is doing the styling for you.
Table of Contents
- What You Need
- Step-by-Step: How to Cut a Sandwich for a Platter So It Looks Professional
- Common Mistakes
- Frequently Asked Questions
- What is the best way to cut a sandwich for a platter?
- Should I chill a sandwich before cutting it?
- What shape looks most professional on a sandwich platter?
- How do I keep sandwich pieces from getting soggy?
- How many pieces should I cut for a sandwich platter?
- How do I arrange sandwich pieces neatly without crowding the plate?
- Conclusion
What You Need
You need very little, and none of it has to be specialist equipment. A chef’s knife with a serrated edge handles most sandwiches, a board with a non-slip mat underneath keeps it from skating while you saw, and a straight edge of some kind keeps your portions identical.
Which knife to reach for
A long serrated knife is the default for a reason. The teeth grip a soft crust without pushing it, and they tear rather than drag when they pass through a soft filling like egg salad or chicken salad. Choose one at least as long as the sandwich is wide, so you are not making two cuts where one will do.
A straight-edge or steak knife gives a cleaner slice through crustless bread, and it is the better tool once you have trimmed the crusts off. It is also the better tool for soft white bread, where serrations can tear the crumb. Both work; the difference is what the teeth do to a crust you did not remove.
Whichever blade you use, a dull knife is the real enemy. It crushes rather than cuts, tears the top slice sideways, and pushes filling out of the seam. If you have to saw hard to get through, the blade has gone dull.
The rest of the setup
A large board gives you room to work and keeps the sandwich from wobbling. A damp towel under the board stops it moving. A metal ruler or a straight knife spine gives you a reference line when you want eight identical pieces instead of seven generous ones and one thin one.
For the platter itself, pick a shape before you cut. A long narrow board suits soldiers and finger-length strips. A round platter suits wedges and pinwheels arranged in a ring. A two-tier stand hides the empty middle of a big round platter and gives you twice the surface without a second dish.
Two optional extras earn their space: a small brush or a damp paper towel for crumbs, and a few sheets of parchment to stack between layers if you are cutting a big batch ahead.
Step-by-Step: How to Cut a Sandwich for a Platter So It Looks Professional
Step 1: Choose a Shape That Fits the Sandwich
Match the shape to the height of the sandwich and the size of the platter. A tall stacked sandwich cut into quarters gives you four tall wedges that sit upright and stable. A flat single-layer sandwich cut into strips gives you neat soldiers that lie in rows. A soft, filling-heavy sandwich is usually better in small squares than in long cuts, because a long cut has more filling to hold together along the way.
| Style | How it is cut | Best for | The look it gives |
|---|---|---|---|
| Diagonal halves | One cut corner to corner | Adult platters, lunch buffets | Generous and substantial, with a long cut face showing the layers |
| Quarters | Halved, then each halve cut again | Layered sandwiches, mixed platters | Four matching pieces, easy to eat standing up |
| Soldiers | Crusts off, cut into finger-length strips | Buffets, tea tables, large batches | Neat rows of crustless strips, the classic catering look |
| Finger sandwiches | Small crustless squares or rounds, cut into quarters | High tea, baby and bridal showers | Delicate and formal, one or two bites each |
| Pinwheels | Flat roll, chilled, sliced into rounds | Wraps and tortilla sandwiches | Spiral cross-section, strong visual pattern |
| Diagonal vs straight: cut diagonally | Corner to corner, not side to side | Almost every platter | Larger surface area per piece and a taller, more elegant silhouette |
My verdict on the diagonal question: cut diagonally unless you have a reason not to. A diagonal cut gives each piece more cut face, so you see the filling layers from across the room, and it makes a small sandwich look deliberate rather than small. Straight cuts are worth it only when you are after a grid of squares, or when the sandwich is very soft and a long diagonal would drag the filling out.
Step 2: Chill and Measure for Cleaner Cuts
Put the assembled sandwiches in the fridge for 15 to 20 minutes before you touch a knife. A cold butter, cream cheese, or egg salad filling firms up just enough to stay put, and the bread loses a little of its softness, so the cut face stays crisp instead of pillowing around the filling.
While they chill, decide your portion size and find the centre of the sandwich. A quartered sandwich is four pieces, so you only need one centre mark. For eight pieces, mark the centre, then the two quarters on each side. Use the tip of a paring knife to score the top bread lightly before you commit, so you can see the line.
If you want every piece identical and your pieces are small, a ruler is genuinely useful here. Measure the width, divide it mentally, and mark each line with the knife tip. I do this on finger sandwiches and it takes five extra seconds per sandwich.
Step 3: Use a Long, Controlled Knife Stroke
Put the damp towel under the board and put your non-dominant hand flat on top of the sandwich, fingers curled back and out of the blade’s path. The pressure from that hand is what stabilises the sandwich, so you do not need to squeeze the knife harder.
Then saw rather than press. Start the blade at the far edge, use a gentle back-and-forth motion, and run it through in one continuous pass to the board. Pressing straight down is what squashes the filling out of the seam and drags the top slice sideways so the pieces no longer match.
Wipe the blade between cuts, especially through anything with tomato or wet salad filling. A sticky blade is the reason your next cut tears instead of slicing. You will know the technique worked when the filling sits flush with the cut face and the piece holds its shape when you lift it.
Step 4: Cut Matching Pieces So the Platter Looks Professional
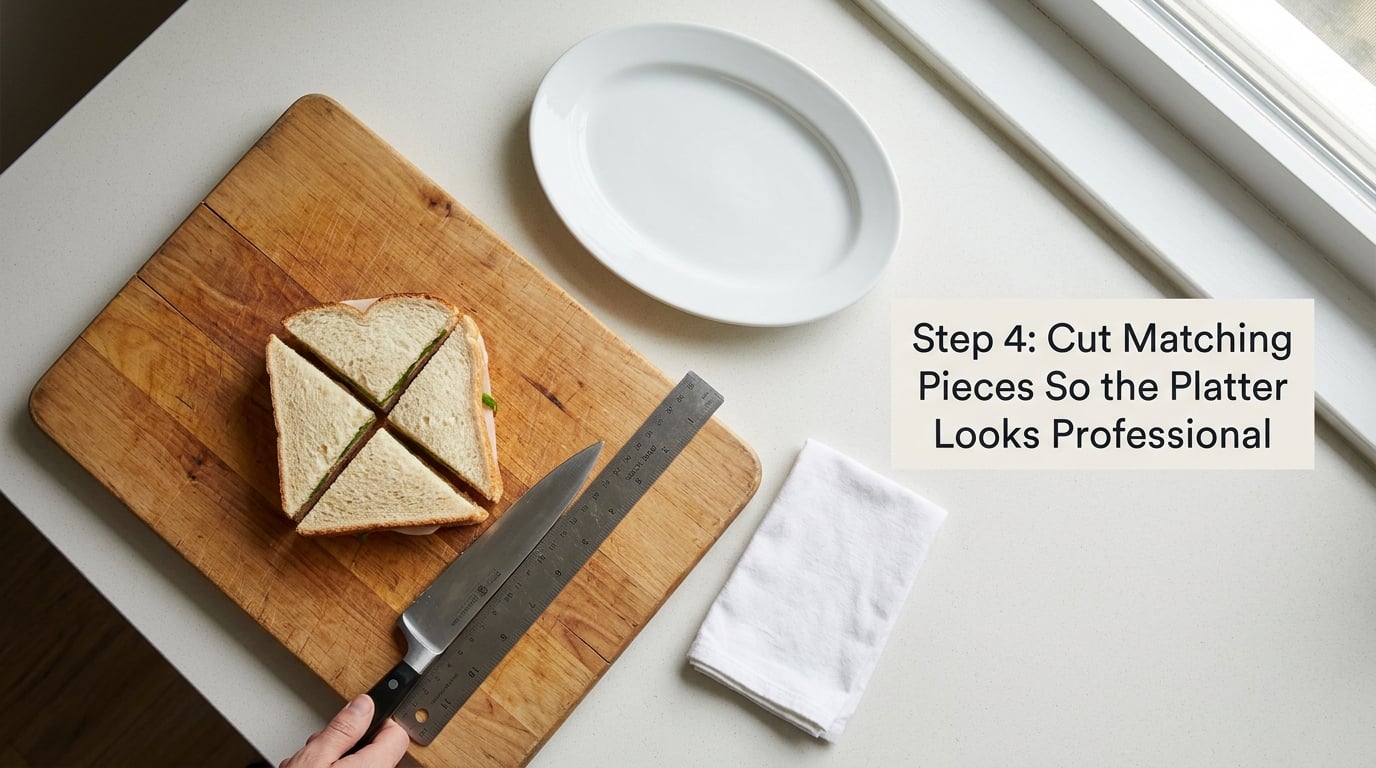
Use your first piece as the template for everything after it. Set it down on the board, then bring each subsequent piece to it before you cut, rather than cutting first and comparing later. Matching size is the single most noticeable difference between a styled platter and an assembled one, and it is invisible effort once you get into the rhythm.
Three habits keep sizes consistent across a whole batch. Square off the bread edges before any cuts go in, so every piece starts from the same footprint. Cut across the sandwich in a single pass at the same angle every time. And if a piece comes out narrow, eat it yourself rather than hiding it under a nicer one on the platter.
Crust removal is the other big upgrade. Running a knife just inside the four edges to lift off the crust makes any shape look more considered, and it stops the pieces from drying out before they are served. It takes about ten seconds per sandwich and it is the step most people skip.
Step 5: Arrange the Pieces for a Finished Look
Group by type first. Put all the egg salad wedges together, all the cucumber sandwiches together, and let each one have its own space on the platter. Mixed at random, a platter reads as leftovers; grouped, it reads as a menu. Aim for three to four groups on a large round platter and no more.
Within each group, overlap the pieces slightly so a little of each one stays visible. Stacking them straight on top of each other hides the cut face, which is the part that looks best. Angle the pieces rather than lining them up in rows, and leave a finger’s width of empty platter around the outer edge as negative space. Overcrowding is the most common reason a homemade platter looks cheap.
Add height once the flat layout is done. Stand a few wedges upright against the pile, or prop a second tier above the centre. Height makes a shallow platter look abundant without adding another sandwich.
For a buffet or a large table, work from the back of the table forward so the pieces you place first stay visible. Set out the platters on a cloth-covered surface so a scratched platter never sits on a bare table.
Step 6: Finish the Platter with Small Details
Brush crumbs off the platter and wipe the rim clean before the food goes down, not after. A clean rim is what makes a platter look like it was photographed. Then add a small amount of garnish: a few sprigs of parsley or dill around the edge, or a light scatter of something the sandwich already contains, like a few capers or crinkle-cut cucumber ribbons.
Fillings that need moisture get a paper towel pressed onto the cut face just before plating, then lifted off. It takes the surface wetness off and stops the pieces from bleeding into each other where they overlap.
Serve within two hours of cutting if you can. Cut sandwiches sitting out are fine, but the ones waiting on a tray are the ones that go soft, and a platter that has been out for three hours never recovers. If you must cut ahead, keep the pieces on a rack rather than a flat tray so the bottom crust does not steam itself soggy, and hold them in the fridge uncovered.
Common Mistakes
A dull knife. It crushes the bread, tears the top slice, and pushes filling out of the seam. Sharpen it, or switch to the knife you have neglected. The failure shows up as ragged, compressed edges rather than clean slices.
Cutting straight out of the fridge. Bread that has just come out of the cold is firmer and often crumbly, especially seeded or wholemeal. Let the sandwiches sit on the counter for 10 minutes after chilling so the crumb relaxes but the filling stays set.
Pressing instead of sawing. Downward force drives moisture out of the filling and slides the top slice sideways. Rest the blade and use a light back-and-forth motion, and let the sawing do the work.
Uneven portions. Sandwiches cut by eye come out seven big pieces and one thin one. Mark the centre and the quarters with a paring knife before the first cut, and use a ruler on small finger sandwiches where accuracy actually shows.
Wet filling between the pieces. Mayo and salad fillings transfer onto neighbouring pieces as they overlap. Pat the cut faces with a paper towel, and hold moist fillings such as tomato, cucumber and pickle out of sandwich layers that will sit on a tray.
Crowding the platter. Pieces packed edge to edge hide each other’s cut faces and slide into one another as guests take them. Leave a finger’s width around the edge and split the batch across a second platter if it will not fit comfortably.
Mixing every type together. Random arrangement gives no place for the eye to rest and makes the platter look bigger than it is without looking more generous. Group by type and give each group its own footprint.
A few presentation habits carry most of the effect: pick a cut shape before you start rather than improvising at the platter, cut to a template rather than by eye, arrange the tallest pieces toward the back, and keep the rim of the platter clean until the last minute.
Frequently Asked Questions
What is the best way to cut a sandwich for a platter?
Chill the sandwich for 15 to 20 minutes, square off the bread edges, mark even portions with a paring knife, then saw through with a long serrated knife in one continuous stroke rather than pressing down. Cut diagonally for adult platters, into quarters for layered sandwiches, and into crustless soldiers for buffets. Pat the cut faces dry before you arrange them.
Should I chill a sandwich before cutting it?
Yes, and 15 to 20 minutes in the fridge is enough. Cold butter, cream cheese and egg salad fillings firm up and stop squeezing out of the seam, and the cut face stays crisp instead of pillowing around the filling. Let the sandwich stand at room temperature for 10 minutes after you take it out so the bread is not too firm to cut cleanly.
What shape looks most professional on a sandwich platter?
Diagonal triangles for adult and lunch platters, crustless soldiers in rows for buffets, and small quarters for tea sandwiches and high tea stands. Whatever the shape, keep it consistent across the whole platter, overlap the pieces slightly so each cut face still shows, and leave a finger’s width of empty platter around the outer edge.
How do I keep sandwich pieces from getting soggy?
Hold moist fillings out of layers that will sit on a tray, and pat each cut face with a paper towel before plating. Store cut pieces uncovered on a rack in the fridge rather than stacked in a sealed box, which traps steam against the bottom crust. Bring the platter out close to serving time, since cut sandwiches left out for hours do not recover.
How many pieces should I cut for a sandwich platter?
Plan on three to four small pieces per adult and two to three per child, with other food on the table. That means roughly 75 to 100 pieces for 25 guests if sandwiches are the main item, so cut small finger-size pieces rather than large wedges. Add half again as many if you are also serving cake or a heavy main course.
How do I arrange sandwich pieces neatly without crowding the plate?
Group the pieces by type and give each group its own footprint, usually three or four groups on a large round platter. Overlap pieces slightly so a little of every one stays visible, angle them rather than lining them up in straight rows, and leave a finger’s width of clear platter around the rim. If the batch will not fit with space, use a second platter.
Conclusion
If you do one thing differently after reading how to cut a sandwich for a platter so it looks professional, chill the sandwiches before you cut them and mark your portions first. Everything after that is technique: a sharp serrated knife, a light sawing motion, and one piece used as a template for all the rest.
Then finish the way a caterer would. Group the pieces by type, overlap them so every cut face still shows, leave a finger’s width of space around the edge of the platter, and add a little height. Fifteen minutes of setup is the difference between a plate of sandwiches and a platter people photograph.