
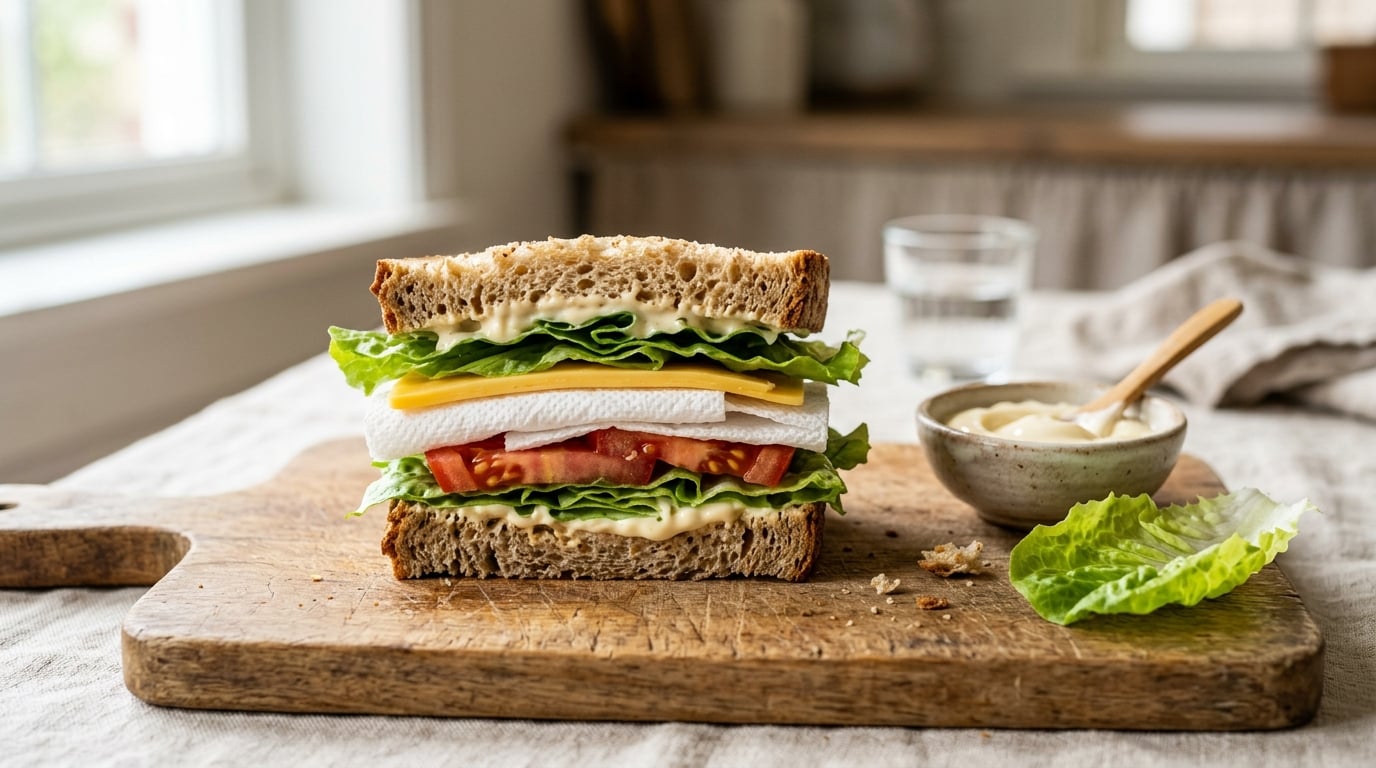
Wet ingredients in the middle, a moisture barrier between the filling and the bread, and dry sturdy bread on the outside. That is the whole rule. Most soggy sandwiches fail at exactly one point: a wet tomato slice or a spoon of mayonnaise sitting straight against a soft white slice with nothing in between.
By lunchtime your sandwich has been sitting three or four hours, which is plenty of time for that moisture to move into the crumb. Bread is a sponge, and once the starch structure takes on water it loses the ability to stay crisp no matter what you do next.
The fix takes about five extra minutes of assembly, and most of it happens before the sandwich is closed. Here is the order, what belongs in each position, and the handful of mistakes that undo all of it.
Table of Contents
- What You Need
- Step-by-Step
- How to keep meal prep sandwiches from getting soggy
- Sandwich-by-sandwich fixes
- Reviving a sandwich that is already soggy
- Frequently Asked Questions
- What is the best order to layer a sandwich?
- What can I put on bread to keep it from getting soggy?
- How do I stop tomato or cucumber from making bread soggy?
- Does mayonnaise help prevent a sandwich from getting soggy?
- How should I store a sandwich so the bread stays crisp?
- Can I use parchment paper to keep sandwiches from getting soggy?
- Short Conclusion
What You Need
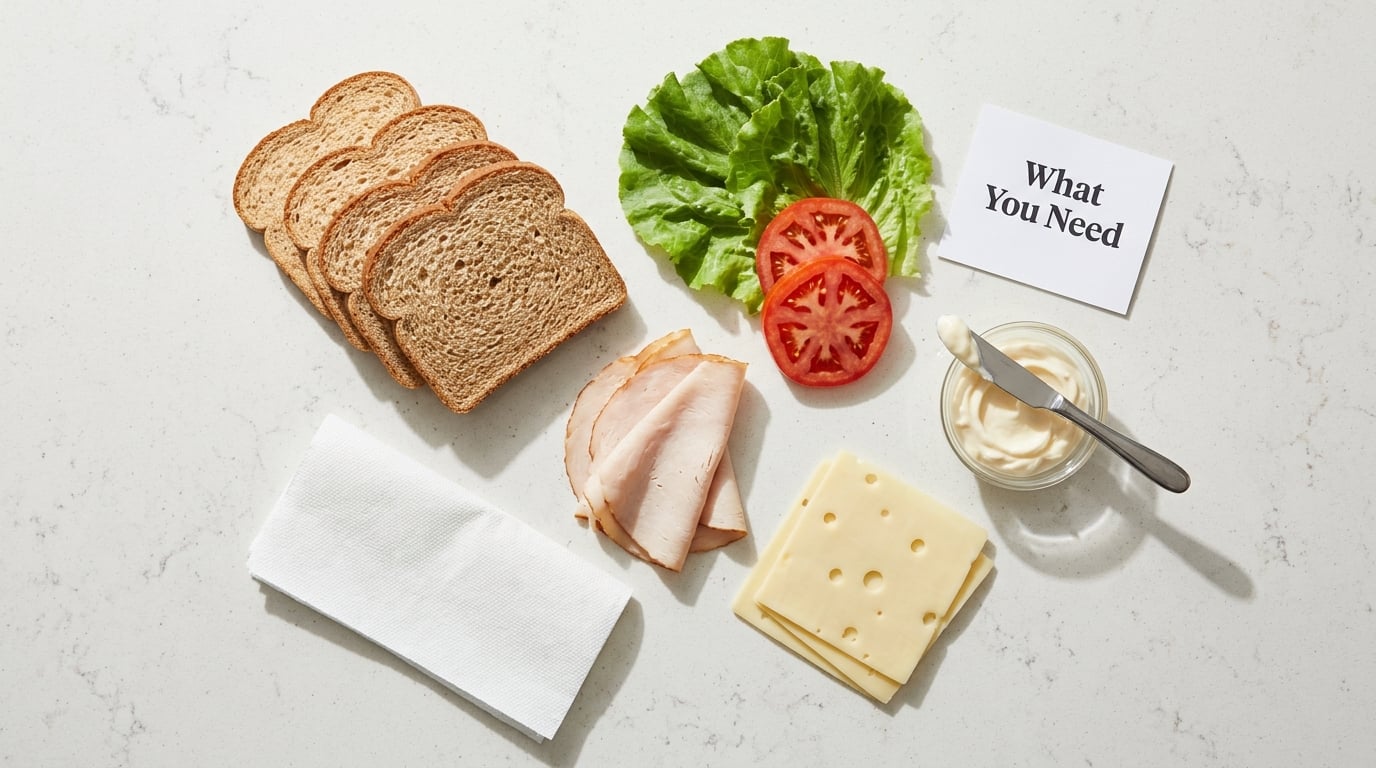
You do not need a special product for any of this. Everything below is a normal grocery store item, and you can build a workable sandwich with as little as a jar of mayonnaise and a roll of paper towel.
Bread that will hold up
Sourdough, ciabatta, a dense whole-grain slice, Texas toast, or thin-crust Italian bread all have enough structure to survive a wet filling. Soft white sandwich bread is the most likely to fail, because there is very little open crumb for moisture to sit in without collapsing the slice.
Lightly toasting whatever you have is the cheapest upgrade available. A low toaster setting that dries the surface without browning it is the move most people land on after a few too many crouton sandwiches.
A barrier that water will not pass through
Full-fat mayonnaise, butter or margarine, Dijon mustard, cream cheese or a firm spreadable cheese, hummus, and nut butter all work. The fat is what matters here, which is why reduced-fat versions are a worse barrier than the full-fat ones people usually have on hand.
A clean leaf of iceberg or romaine is the free version, and a folded paper towel is the emergency version. Both sit between the wet filling and the bread and take the hit instead of the slice.
Dry layers that give the sandwich its structure
These are the ingredients with the least water in them: crisp lettuce leaves, sliced cheese, patted-dry deli meat, shredded chicken, chopped hard boiled egg, sprouts, and thin slices of apple or pear if you want something sweet alongside the salt.
Cheese does double duty here. A slice of low-moisture cheese on each side of the filling is a solid barrier that also keeps the sandwich from collapsing when you cut it in half.
Wet fillings that need prep first
Tomatoes, cucumbers, pickles and olives, roast beef, tuna salad, egg salad, sauerkraut, and anything sauced. These are the ingredients that need draining, salting, patting or cooling before they ever touch bread, and they are also the reason most overnight sandwiches fail.
Packing gear
A paper towel for patting, a colander or sieve for draining, a sharp knife, and something to line the container with. A hard-sided container is what keeps a sandwich from being crushed on the way to work; a soft zip bag does the opposite and squashes the top slice flat against the filling.
Step-by-Step
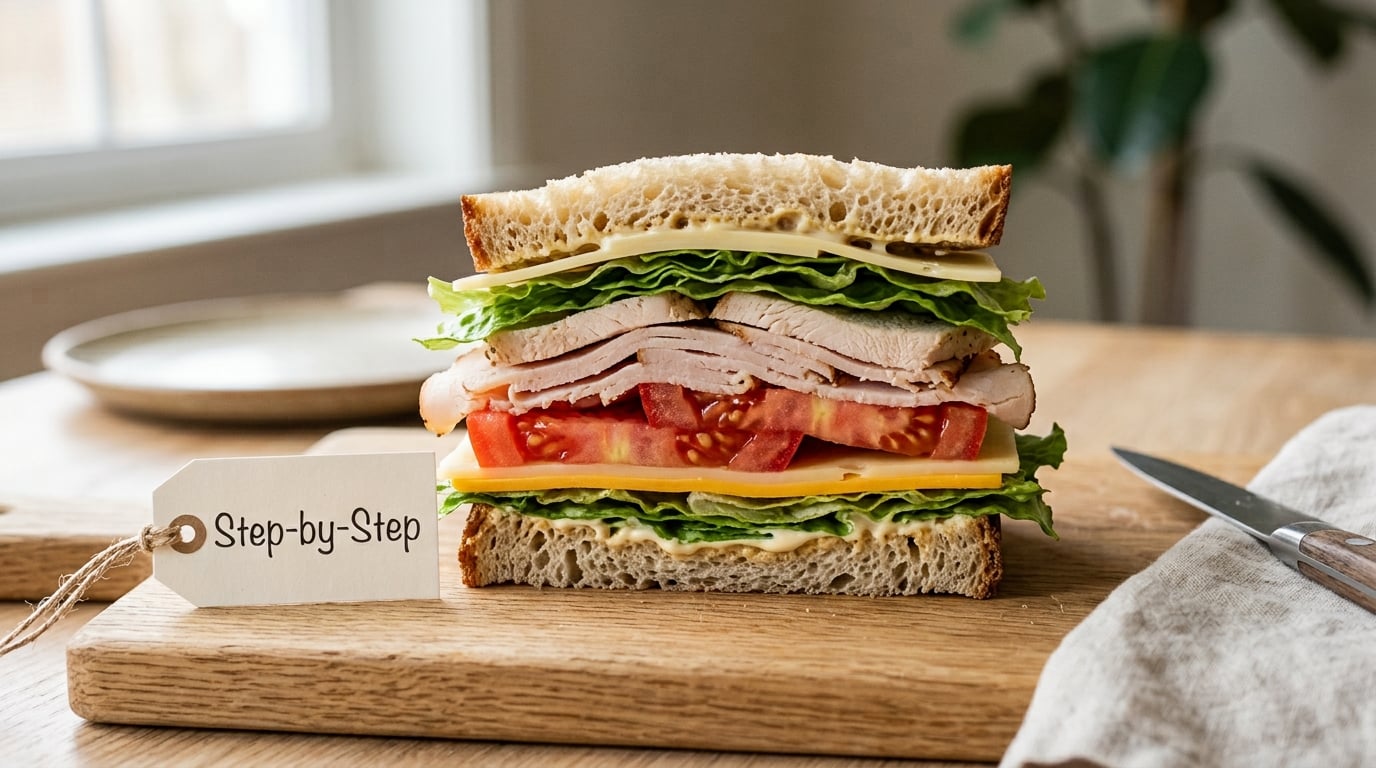
Layer a sandwich bottom to top like this: dry bread, barrier spread, dry structural layer, second barrier layer, wet filling in the exact centre, dry layer again, then the top bread with its own coat of spread. The wettest ingredient never touches bread directly, and the two slices are separated from the filling by two independent barriers. That is how you keep sandwiches from getting soggy, and the order takes about five minutes to build.
- Dry the bread, or pick a sturdy slice.
- Spread a barrier edge to edge on both slices.
- Add a dry structural layer to the bottom slice: lettuce, cheese or deli meat.
- Add a second barrier: another lettuce leaf or a folded paper towel.
- Place the wet filling in the exact centre, leaving a dry margin around it.
- Add a dry or crumbly layer on top, such as shredded cheese or sprouts.
- Close with the top slice, press gently, wrap, and keep it cold.
Choose a Dry Bread Base
Start with bread that is already on the dry side, or make it that way. Toasting drives off surface moisture and firms the crust, and a slice that has been lightly toasted can hold a wet filling for hours where the same bread fresh off the bag turns to paste by second period.
The setting matters more than most people expect. Too high and you get a crouton that crunches for two bites and then goes soft anyway. The useful zone is a low setting that leaves the slice slightly crisped with no colour change, and a toaster oven at a low temperature does the same job if you are making four at once.
Sourdough and ciabatta hold up without any toasting because their open crumb drinks moisture rather than turning to glue. The tradeoff is flavour: a toasted slice tastes like toast, and a sturdy artisan loaf tastes like bread. Both are fine, they just change the sandwich.
Add a Moisture Barrier
The barrier is the layer that decides whether your sandwich survives until lunch. Spread it edge to edge, not in the middle, because the edges of a slice are the first part to go soft and the first part you notice when you are eating.
Mayonnaise is the most reliable everyday choice. It is full fat, it spreads smoothly, and it does not change the flavour of most sandwiches noticeably. Butter or margarine does the same job and adds a slight richness. Dijon or yellow mustard works well on ham, roast beef and turkey sandwiches, and a firm cream cheese is the strongest barrier of the lot if the sandwich can handle the tang.
There is a second mechanism that gets confused with this one, and it is worth separating. Community advice about putting condiments on the filling rather than the bread is about sauce migration, not about sealing the crumb. Mayo on the bread is a barrier. Mayo spooned between turkey and tomato is a sauce, and it will run out of the sides no matter which slice is underneath it. The two can be used together, but they solve different problems, and the barrier is the one that stops sogginess.
Here is how the common barriers compare in practice:
- Full-fat mayonnaise – the most forgiving, barely changes flavour, works on almost every sandwich.
- Butter or margarine – reliable and cheap, adds a mild richness that suits PB&J and grilled sandwiches.
- Dijon or yellow mustard – sharp enough to notice on mild fillings, excellent with cured meat.
- Cream cheese or firm spreadable cheese – the thickest barrier available, tangy, pairs well with fruit and cucumber.
- Hummus – works well, slightly grainy on very soft bread.
- Nut butter – the classic PB&J fix; the fat blocks the jelly from reaching the crumb.
- Crisp lettuce leaf – free, and it is the layer most sandwich chains rely on.
- Folded paper towel – the last resort for a very wet filling, and it works better than people expect.
Put Dry Ingredients Directly on the Bread
Whatever is driest goes closest to the bread. Lettuce, cheese and deli meat have very little water to give, so even if the slice picks up a little oil or a trace of sauce, nothing catastrophic happens.
This is also the position that decides whether the sandwich survives being picked up. Dry layers give the filling something to grip, and people on r/Cooking point out the same thing when they talk about order: ingredients that slide are a structural problem before they are a taste problem.
The bottom slice and the top slice are not always identical, which is where a lot of home builds go wrong.
- Bottom slice – barrier spread, then the toughest dry layer you have. Cheese or a sturdy lettuce leaf first, because the bottom slice carries the weight of everything above it.
- Top slice – barrier spread, then the softest or crunchiest thing you have. A crisp lettuce leaf or shredded cheese on top protects the slice from sauce and from being squashed against the filling.
- Middle – every wet ingredient, stacked together and centred, with a dry margin of a centimetre or so left at the edges of the bread.
Leave that margin. Wet filling pushed to the very edge of the slice is the single most common reason a sandwich arrives at lunch structurally destroyed, and the liquid runs down the side of the bread on the way to your mouth.
Place Wet Fillings in the Center
Centre of the sandwich, always. The middle is where moisture spreads slowest because the filling is surrounded on all sides by other filling rather than by an exposed bread surface, and it is the only position where two wet items are not stacked directly on top of each other.
Tomatoes and cucumbers need a specific treatment. Salt the tomato slices, leave them on a sieve or colander for ten to fifteen minutes, blot the surface with a paper towel, and discard what collects underneath. The salt draws out water that would otherwise soak straight into the bread, and the blot removes what is sitting on the surface right now.
Pickles and olives go in a colander and get patted dry. Roast beef and ham get patted dry if they are packaged in liquid. Tuna salad, egg salad and chicken salad are the hardest case, because the filling itself is wet and cannot be drained; the answer there is a thicker barrier and a lot of dry layers, and honestly, not much else.
Anything hot gets cooled first. A grilled cheese with cheese still melted inside, or a Reuben with the cheese straight off the griddle, traps steam against the bread. That steam condenses on the way to the lid of the box and comes back down as water, and the sandwich is wet before it leaves the kitchen.
Order within the middle matters too. A tomato placed on top of lettuce slips out the moment you pick the sandwich up, which is the reason tomato before lettuce is the recommendation in r/Cooking, and the reason the burger-style order in the r/AskReddit thread puts the wet protein in the centre with dry leaves above and below it.
Finish with a Protected Top Layer
The top of the sandwich is where a loose sauce does its damage, so the last layers go on in reverse: a dry or crumbly layer, then a barrier if the filling is oily, then the top slice with its own coat of spread on the inner face.
Press the sandwich gently once it is closed. A light press makes the layers contact each other and slows evaporation at the edges, and a hard press squeezes liquid out toward the sides where the bread is exposed. Half a minute under a flat weight is plenty; a heavy book will crush the filling and give you the same result as a soft lunch bag.
Wrap it, and the choice of wrapping depends on what you are dealing with. Parchment or wax paper wicks moisture away from the surface, which helps when the filling is already leaking. It cannot rescue a wet filling, and the people who say so in packing forums are right about the limitation. A hard-sided container protects the shape. Wrapping in foil or plastic without a hard case traps humidity and steam with nowhere to go, which is the mechanism behind a sandwich that is drier looking in the bag than it was in the fridge.
Keep it cold, and keep it out of a warm car. Cold slows the migration of water; heat speeds it up and softens the bread faster than anything you did to the layering order.
Common Mistakes
Almost every soggy sandwich I have had traces back to one of these seven, and each one has a two-second fix at the assembly stage.
- Condiments spread straight onto the bread. Mayonnaise, mustard and salad dressing soak into the crumb immediately. Fix: spread the barrier first, and put the sauce on the filling.
- Assembling with a hot filling. Steam condenses under the lid and the sandwich is wet before you close the box. Fix: cool the filling to room temperature, or nearly.
- Washing lettuce and not drying it. Water on the leaves goes straight into the bread. Fix: spin or pat every leaf dry, and never assemble over a wet cutting board.
- Stacking wet on wet. Tomato on cucumber, or sauerkraut against tuna salad, creates a puddle in the middle with no dry layer to catch it. Fix: put a lettuce leaf or a slice of cheese between any two wet fillings.
- Skipping the barrier entirely. This is the mistake people make when they are in a hurry, and it is the one that costs the most. Fix: mayo takes four seconds to spread.
- Overloading. A sandwich with too many wet fillings has nowhere to put the liquid, and the more you add the more it squeezes out. Fix: fewer wet items, more dry ones, and cut it in half to eat.
- Packing soft. A zip bag crushes the top slice against the filling and squeezes liquid out of the seam. Fix: a hard-sided container, with a layer of parchment or wax paper between the sandwich and the lid.
How to keep meal prep sandwiches from getting soggy
You can pre-make sandwiches, and the storage times below are safe as well as texturally workable. The fix for a week of prep is to stop treating a sandwich as one object and start treating it as a kit: store the components separately and assemble in about ninety seconds each morning.
If you must build ahead, build them in this order: toast or pick the bread, wrap each slice individually so it never touches a wet surface, keep the wet filling in a sealed container drained and separated from everything dry, and hold the barrier spread in its own container. Assemble the night before at the latest, refrigerate at or below 40 F (4 C), and pack ice packs for anything that will be out for more than two hours.
Once a sandwich is assembled, the safe and the crisp windows are not the same length. The safety guidance is the standard advice: refrigerate perishable sandwiches within two hours of assembly, or one hour if the air temperature is above 90 F (32 C). Poultry goes in only after cooking to 165 F (74 C), ground meat to 160 F (71 C), and whole cuts of meat and fish to 145 F (63 C). Once assembled, the texture clock is running:
- Plain deli turkey, ham or roast beef, no raw vegetables – safe for three to four days refrigerated, and stays reasonably crisp for about a day with a full barrier.
- Turkey or ham with lettuce and tomato – one day refrigerated. After that the tomato has been sitting against the filling long enough to make everything around it damp.
- Cooked egg, tuna or chicken salad – three to four days refrigerated, and you should expect a softer bread by day two no matter how the sandwich was built.
- Grilled or pressed sandwich – eat within a day. Reheating in a toaster oven or on a panini press re-crisps the bread and drives off surface moisture, but it cannot reverse a filling that has already soaked in.
- Unrefrigerated, in a cool lunchbox with an ice pack – four hours is the usual ceiling for perishable fillings. In a hot car, treat it as two.
For a weekly batch, Sunday assembly with components stored separately beats Monday assembly of finished sandwiches every time. It is also much less work than it sounds: slice the bread, grate nothing you do not have to grate, and put everything in four containers.
Sandwich-by-sandwich fixes
Some sandwiches fail in their own specific way, and the layering order is only half of the fix. These are the recurring ones.
PB&J
Spread nut butter on both slices and keep the jelly in the middle. The fat of the nut butter is the barrier, and the jelly never reaches the crumb. A thin margarine or butter layer on the jelly side works too, and it is the oldest fix in this whole topic.
Turkey or ham club
Classic club order is a hard problem: bacon and tomato are both wet, and turkey is the driest thing in the stack. Toast the bread, spread mustard on both slices, add lettuce to the bottom, then turkey, then cheese, then bacon and tomato, then a lettuce leaf as the lid for the filling before the top slice. The bacon goes last of the wet items so nothing sits on top of it.
BLT
The lettuce is the barrier, and it has to be bone dry. Toast the bread properly here rather than lightly, spread mayo on both slices, then lettuce, then tomato, then bacon on top. The bacon should be cool and blotted, because bacon fat and hot tomato water are the two things most likely to turn the slice to mush.
Reuben
Rye is dense enough to tolerate this one, but sauerkraut is a reservoir of liquid. Drain it hard in a colander, squeeze it in your hands, and treat it as a wet filling that goes in the centre. The corned beef goes in layers so the liquid spreads rather than pools, and a slice of cheese between the meat and the bread is worth more than any amount of toasting.
Tuna or egg salad
The filling is wet no matter what you do, so change the strategy rather than fighting it. A thicker barrier such as cream cheese or a double layer of full-fat mayo, two slices of cheese on either side of the filling, and sturdy rye rather than white bread. This is the sandwich where paper towel earns its place.
Sub or hoagie
A long roll overnight is the hardest case, because the cut face is a huge exposed surface. The overnight sub answer is to keep the wet parts out of the sandwich entirely: store the meat, cheese and vegetables separately overnight, dress them in the morning, and assemble last. If it has to be assembled already, use a hoagie roll rather than a soft Italian loaf, line the inside with a full-length lettuce leaf, drain every wet ingredient twice, and cut the sandwich in half before it goes into the bag so the exposed surface is not one giant face.
Banh mi
Pickled carrot and daikon are wetter than they look. Drain them, put a thin layer of mayo on the baguette before anything else, and keep the cilantro and sliced peppers on top rather than underneath, where they press juice into the bread. Baguettes are the best bread here because the crumb is open enough to take the moisture without collapsing.
Grilled cheese
The one that is usually ruined by heat rather than by a wet filling. Butter the outside, assemble with cheese only, and let it cool on a rack for two or three minutes before closing the container. Cutting it while the cheese is still molten means you get a sealed sandwich that steams itself wet inside the box by lunch.
One honest note, because it comes up constantly in the discussions this method comes from: some people simply like a soft sandwich, and the effort is not worth it to them. That is a fine position. The layering order matters when the sandwich has to survive a lunchbox, and it does not need to be the default way you make dinner.
Reviving a sandwich that is already soggy
You cannot reverse it, but you can recover most of the texture. A soggy sandwich gets a few minutes in a toaster oven or under a broiler, cut-side open, until the surface dries and re-crisps. A panini press does the same job with pressure added, and it re-seals a prebuilt refrigerated sandwich better than an oven does.
Take it apart first if you can. Draining the wet filling onto a paper towel and swapping in fresh bread turns a ruined sandwich into a workable one in about a minute, and for a sandwich that has been sitting in a bag since morning that is usually the better play.
Frequently Asked Questions
What is the best order to layer a sandwich?
Build it dry to wet and back to dry: bread, barrier spread, dry layer, second barrier, wet filling in the centre, dry layer, top bread. The wettest ingredient never touches bread directly, and both slices get their own coat of spread so you have two independent barriers instead of one.
What can I put on bread to keep it from getting soggy?
Full-fat mayonnaise is the most reliable everyday option. Butter, margarine, Dijon or yellow mustard, cream cheese, hummus and nut butter all work, because the fat blocks water from entering the crumb. A crisp leaf of lettuce or romaine is the free version, and a folded paper towel takes the hit when the filling is very wet.
How do I stop tomato or cucumber from making bread soggy?
Salt the slices, leave them on a sieve for ten to fifteen minutes, then blot the surface with a paper towel and discard the liquid underneath. The salt pulls out water that would otherwise soak straight in. Once they are dry, put them in the exact centre of the sandwich rather than against the bread.
Does mayonnaise help prevent a sandwich from getting soggy?
Yes. Full-fat mayonnaise is a moisture barrier: the oil and protein coat the surface of the slice and slow the transfer of water into the crumb. Spread it edge to edge on both slices before anything else goes on. Reduced-fat versions have less fat and make a noticeably weaker barrier, so use the full-fat jar.
How should I store a sandwich so the bread stays crisp?
Refrigerate it in a hard-sided container lined with parchment or wax paper, and keep perishable fillings cold at or below 40 F (4 C). Assemble no more than a day ahead. Avoid a soft zip bag with no rigid case, because it crushes the top slice against the filling and squeezes liquid into the seam.
Can I use parchment paper to keep sandwiches from getting soggy?
Parchment and wax paper wick surface moisture away, so they help when a filling is already releasing liquid, and they stop that liquid sitting against the bread and the lid. They cannot rescue a genuinely wet filling, because the water has already moved into the crumb by then. Use them alongside a barrier, not instead of one.
Short Conclusion
Do this first: spread a layer of full-fat mayonnaise edge to edge on both slices before anything else goes on. It takes four seconds and it is the single change that makes the biggest difference, because it puts a barrier between every wet filling and every piece of bread.
After that it is just the order. Dry bread, barrier, dry layer, second barrier, wet filling in the centre, dry layer, top bread. Press it once, wrap it in parchment or wax paper, put it in a hard-sided container, and keep it cold.