
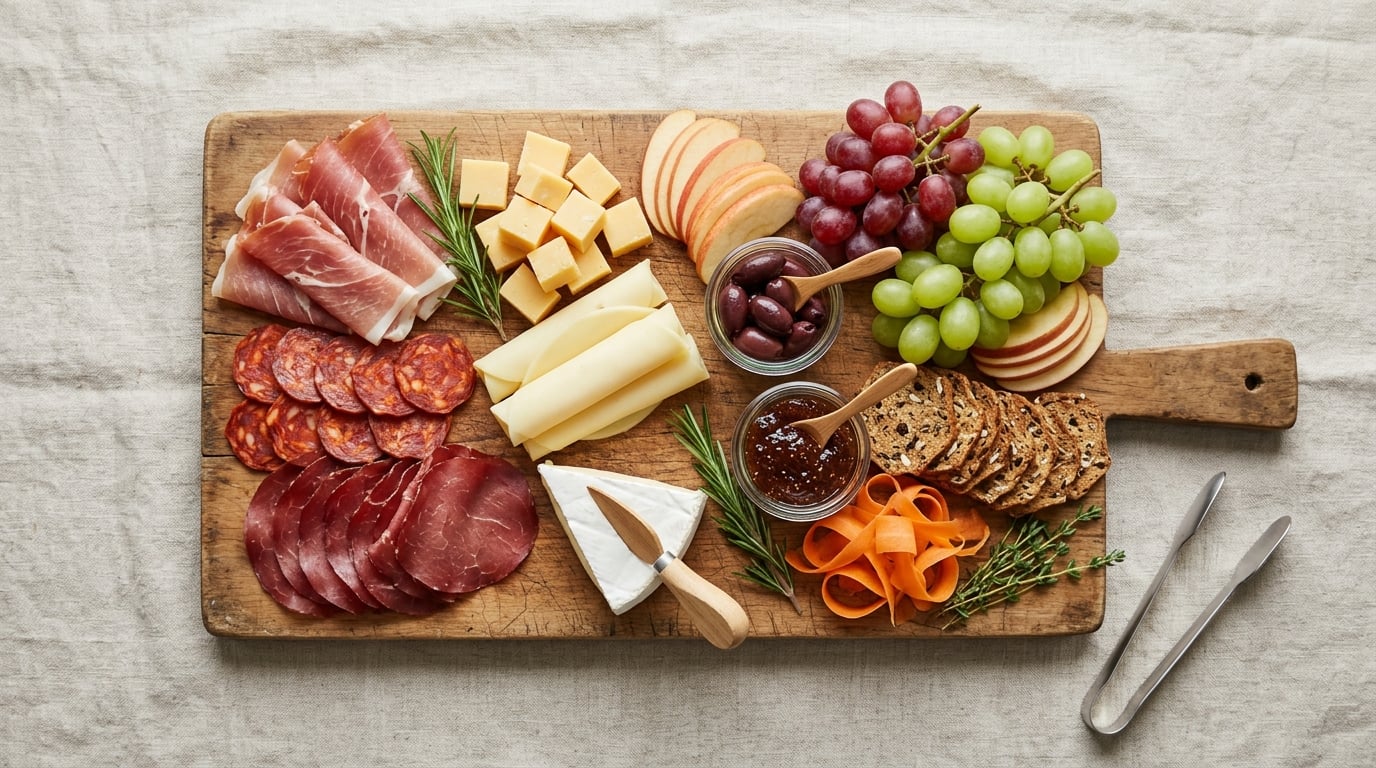
How to build a charcuterie board on a $30 budget? Feed six to eight people as an appetizer, spend about an hour assembling, and never turn on the oven. The money goes in four places: a modest cheese selection, pre-packaged cured meats, seasonal produce, and cheap fillers that add visual volume. Everything else is technique.
Cheese is where most budget boards fall apart, and the fix is not buying better cheese. It is buying less of it in bigger blocks and slicing it thinner. Most of the visual weight on a board comes from cured meat, fruit and crackers, and all three cost a fraction of what a specialty cheese costs per ounce.
Home hosts posting in r/CharcuterieBoard about the same experiment usually land somewhere in the mid-twenties all-in, and the recurring lesson is that the receipt matters more than the plan. Southern Living reported a fall-themed board built almost entirely from discount-store ingredients coming in just under the cap, with cheese still the biggest single line. That is the normal shape of this board: cheese is the expensive part, and everything else is a rounding error you get for free once you have the cheese.
The numbers below are what to aim for, not what every store charges. Grocery prices shift by region and change month to month, so treat the split as proportions and let your own receipt settle the argument. Updated for 2026.
Table of Contents
- What You Need
- Step-by-Step
- Frequently Asked Questions
- How many people can a 30-dollar charcuterie board serve?
- What foods should I buy first when building a charcuterie board on a 30-dollar budget?
- Can I make a charcuterie board without a special wooden board?
- What are good vegetarian substitutions for a 30-dollar charcuterie board?
- How long can a charcuterie board sit out safely?
- How do I make a budget charcuterie board look impressive?
- Conclusion
What You Need
A 30-dollar charcuterie board needs seven food categories, one surface to serve on, and three or four small bowls. That is the whole equipment list, and most of it is equipment you already own.
Budget assumptions
The plan assumes pre-tax grocery spending, shopping at a discount or value grocer rather than a specialty cheese counter, and using whatever is genuinely in season. Two of those three change what you can buy. If you shop a natural grocery or a cheese counter, the same template will run noticeably higher and you will need to cut a category to make it fit, usually the sweet accent or one of the fillers.
It also assumes an appetizer spread, not a main course. Guests pick at it for an hour or two alongside other food. If the board is the meal, double the meat and cheese and expect the cost per person to roughly double.
How much food to buy per person
The working number most home hosts use is one to two ounces of cured meat and about one ounce of cheese per person, plus a handful of crackers and a few pieces of produce. People eat far less charcuterie than they think they will. A board that looks sparse when you build it usually disappears in twenty minutes, and a board built for twice that will have you eating the same salami for a week.
| Guests | Cured meat | Cheese | Crackers, bread and produce | Surface you need |
|---|---|---|---|---|
| 4 | 6 to 8 oz | 5 to 6 oz | 8 oz | Small platter or dinner plate |
| 6 | 10 to 12 oz | 8 to 9 oz | 12 oz | Medium cutting board |
| 8 | 14 to 16 oz | 10 to 12 oz | 16 oz | Large board or two platters |
| 10 | 18 to 20 oz | 14 to 15 oz | 20 oz | Large board, add a second spread |
| 12 | 22 to 24 oz | 17 to 18 oz | 24 oz | Sheet pan or two boards |
Six to eight people is the sweet spot for this budget. Twelve is possible, but you end up with four of something rather than six of something, and variety is what makes a board look generous.
Reusable equipment
You do not need to buy a serving board, and honestly you do not need a wooden one. A rimmed sheet pan, a large cutting board, a baking sheet lined with parchment, a wide dinner platter, or a clean pizza board all work. What matters is that the surface is food-safe, flat, and has a lip or a piece of parchment under the edges so nothing runs off.
For the small bowls, reuse what you have. Glass jam jars, a yogurt cup with the lid off, a small ramekin, even a folded napkin holding a dollop of hummus in a pinch. Two or three is enough; more than four and you have built a dip station instead of a board.
The rest of the kit is short: small tongs or two forks for the meat, a cheese knife or butter knife, a paring knife for slicing, a board for prep that is not the serving surface, and a stack of napkins. Put napkins on the board rather than on a side table. Guests who cannot find them stop grazing, and grazing is the whole point.
How to split the 30 dollars
Spend roughly a third of the budget on cheese, a quarter on cured meats, and spread the rest across produce, crackers, one spread, a sweet accent and a couple of fillers. Fillers are the cheapest visual volume you can buy and they are the first thing most beginners forget.
| Category | What to buy | Share of the budget |
|---|---|---|
| Cheese | Two hard cheeses and one soft or goat cheese, bought in blocks and sliced at home | 30 percent |
| Cured meats | Two pre-packaged selections plus one hot-section item, no deli counter | 24 percent |
| Produce | One seasonal fruit, one apple or pear, one vegetable for color | 18 percent |
| Crackers and bread | One sturdy cracker and one baguette or loaf, or two cracker styles | 12 percent |
| Dips and spreads | One savory spread such as hummus or pâté, one sweet spread such as jam or fig spread | 8 percent |
| Sweet accent | Dried fruit, chocolate squares, or a few cookies | 5 percent |
| Fillers | Olives, nuts, pretzels, pickles | 3 percent |
Cheap substitutions that keep the look
Swap freely, as long as you keep four textures in play: something soft, something hard, something crisp and something creamy. That is the actual rule. A board with only soft items reads as a pile, and a board with only crisp items reads as a snack bag.
- Soft cheese: goat cheese rounds, a soft wheel, or whipped ricotta if the sticker price is low. Skip the imported triple-creme wheel; you pay specialty-counter money for a difference most guests will not notice on a mixed board.
- Hard cheese: aged cheddar, white cheddar, gouda or a store-brand block. Buy the block, not the pre-shredded bag, and not the wedge in plastic with a resealable corner.
- Cured meat: pre-packaged salami, chorizo, pepperoni or a tapas-style pack. Deli-counter slicing feels expensive and frequently is, with little to show for it on a board this size.
- Produce: grapes travel well and need no prep, apples add color and crunch, and a carrot cut into ribbons or coins adds a bright note for almost nothing.
- Crackers: one sturdy variety that does not shatter under a cheese knife, and one thin or seeded variety for contrast. Baguette rounds toasted in a hot oven for six minutes beat most crackers on cost.
- Fillers: marinated olives, mixed nuts, pretzel twists, cornichons. A jar of olives is one of the highest-value items on the whole board.
One honest limitation of shopping a value grocer: it often does not carry small jars of nice pickles or tapenade, and it rarely has a cheese counter. Jarred olives, a block of cheddar, and pretzels cover the same visual role. One poster building an Aldi board noted the small pickle jars were the one item they could not find and had to leave out, and the board still worked.
Step-by-Step
Build order is the part beginners get wrong, and getting it wrong is why a first board looks flat even when the food is good. Bowls and dips go down first, then cheeses spaced apart as anchors, then meats folded between them, then crackers and produce filling gaps, then tangy and sweet accents last. Follow that order and a modest board reads as abundant.
Step 1: Choose Your Board and Plan the Layout
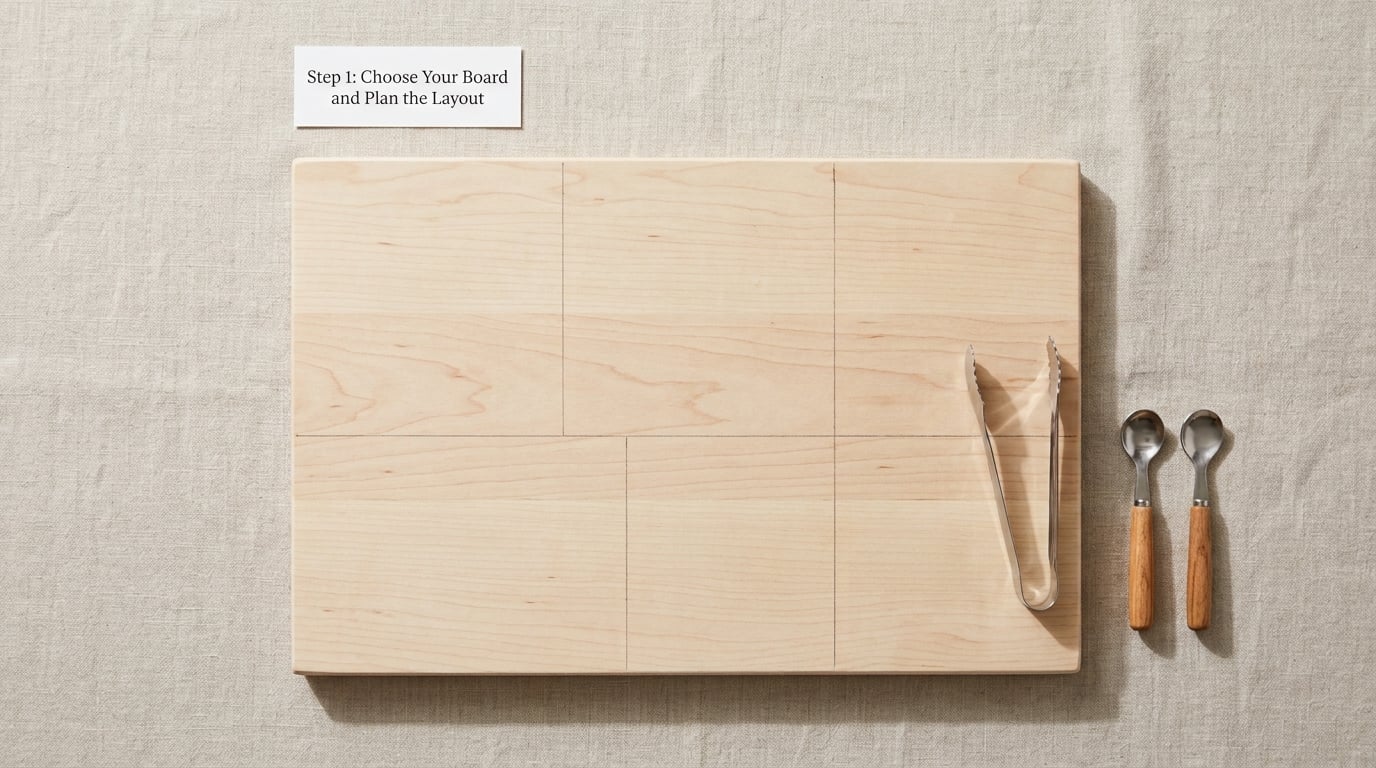
Pick a surface sized to your guest count, not to the ambition. Six to eight people fits a medium cutting board; twelve needs a sheet pan or two platters. A surface that is too small is the one mistake styling cannot fix, because the food has nowhere to go and everything ends up touching.
Before any food comes out, divide the surface mentally into five zones: proteins, cheeses, produce, crackers, and dips with garnishes. Account for the bowls too, since they take up real footprint and should sit where a hand can reach them without crossing the whole board. You will not see the zones once it is full, which is the point.
You will know this step worked if you can point to where each category will go without moving anything. If two zones overlap, the surface is too small.
Step 2: Set Up Cold Storage
Chill the board itself if it is wood, and keep the meats and cheeses refrigerated until the moment you start building. Cold cheese is firm cheese, and firm cheese slices cleanly instead of smearing across the board.
For transport, use shallow ice packs under the surface rather than loose ice on top, and keep them out of contact with the crackers so they do not go soft. If you are hosting somewhere else, a cooler with the board flat on top of the ice packs works fine.
Keep perishable foods at or below 40 degrees Fahrenheit, which is 4 degrees Celsius. Do not leave perishables at room temperature for more than two hours, and no more than one hour if the outdoor temperature is above 90 degrees Fahrenheit. Follow the storage dates and handling instructions printed on each package, and if a package says refrigerate after opening, put it back in the refrigerator within the stated window.
You will know this step worked if the cheese still holds a clean cut and the sliced meat has not gone glossy or tacky to the touch.
Step 3: Prep and Portion the Foods
Slice the block cheeses into thin pieces, roughly a quarter-inch, and cut the soft cheese into a small wheel or thick coins. Thin slices read as abundance and cost the same as thick ones. Curl or fold the soft cheese rather than serving it flat; the fold adds height for nothing.
Slice cured meat on the bias and fold the slices into loose ribbons or a few simple rosettes. This is the cheapest styling trick available and it is the one that changes a board most, because flat meat looks like deli meat while folded meat looks composed.
Leave crackers and dips whole and accessible rather than fanning them into perfect rows. Cut apple and pear slices just before serving so they do not brown, and toss them in a little citrus juice if you are setting up early.
Use a separate utensil for every item, and keep allergen-friendly foods in their own clearly separated zone with their own utensil. Cheese, nuts and cured meats are the common allergens here, and a nut cluster sitting next to a communal cracker pile is the one place a careful host gets into trouble.
You will know this step worked if every item is portioned for one or two bites and nothing is touching something it should not touch.
Step 4: Build the Board in Visual Groups
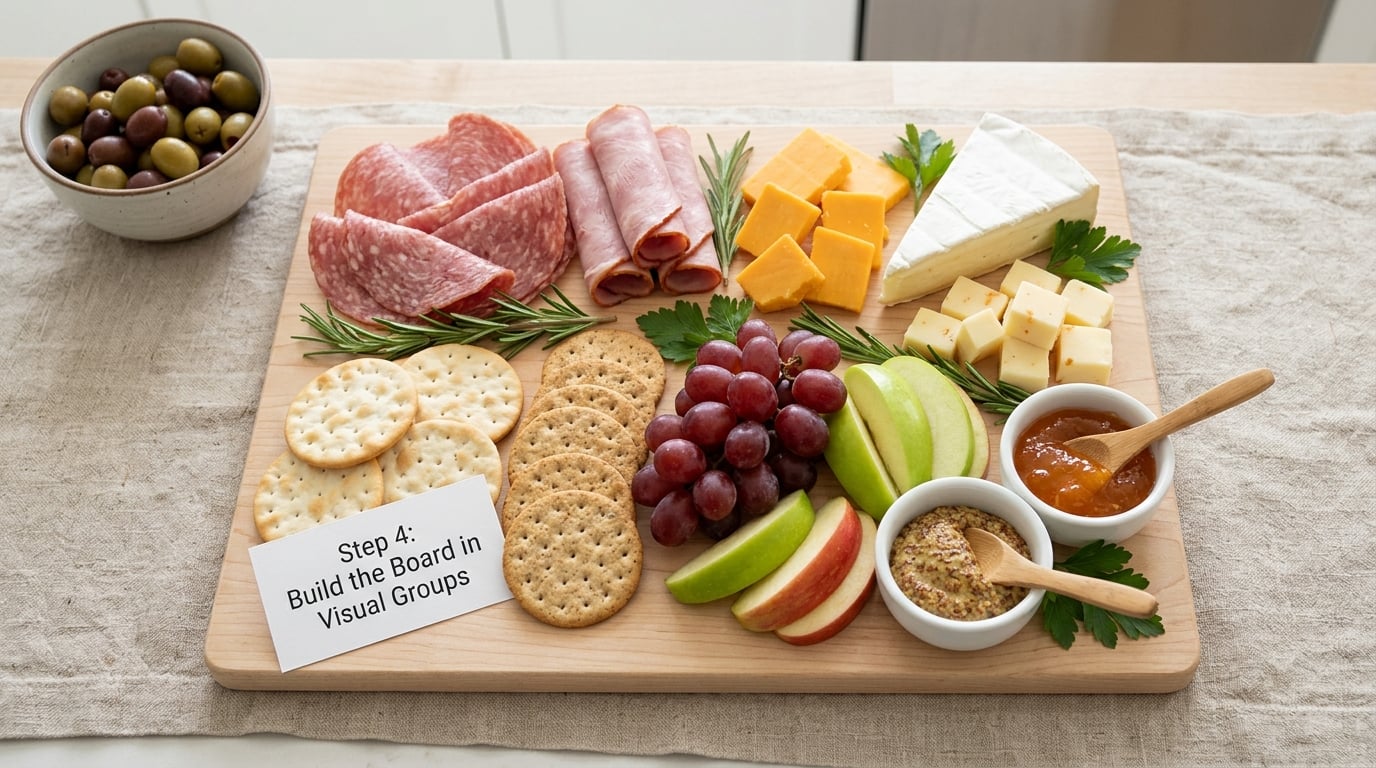
Place the bowls and small dishes first, in their planned zone. They are the fixed points of the layout, and everything else arranges itself around them once they are down.
Then set the cheeses, spaced apart rather than touching, with the largest pieces anchoring the layout. Cheeses are the structural elements of a board; everything else fills space between them. Spread them out more than feels right at first, because the meat and crackers you add next will close the gaps for you.
Fold the meats and tuck them into the spaces beside and between the cheeses. Then add crackers and bread, standing slices upright in a jar or a folded paper cup if you have one. Vertical crackers are the fastest way to make a flat board look dimensional, and they cost nothing.
Fill every remaining gap with produce: grapes in clusters, apple and pear slices fanned, carrot ribbons or coins. Negative space is what makes a board look expensive, and produce is the item that closes gaps best without crowding. Then finish with the tangy and sweet accents, olives and pickles in their bowls, dried fruit and nuts in small loose piles rather than one large heap.
You will know this step worked if you can see six or more distinct groups, the colors alternate as your eye moves across the board, and there are no two foods touching that belong to the same texture family.
Step 5: Add Low-Cost Finishing Touches
Fresh herbs are the highest-impact garnish per cent spent. Small sprigs tucked between cheese groups and a few leaves scattered over crackers add color that a bag of plastic garnish never will. Edible flowers work the same way if you can find them cheaply or grow them.
Toasted nuts, a spoonful of dried fruit, or a few extra pickles in a reused jar add texture and a bit of height. Reused jam jars holding mustard, fig spread or olives cost nothing and give the board bowls without a shopping trip for ramekins.
Two rules for finishing touches. Only use food-safe items near food, which sounds obvious until someone sets a small vase of faux flowers in the middle of a serving board. And keep the total garnish sparse; a board with green sprigs at six deliberate points looks styled, while one with green everywhere looks like a salad.
You will know this step worked if the board has at least three colors and the tallest elements sit in three or four places rather than one.
Step 6: Serve, Restock, and Clean Up
Label items if any guest has an allergy, and place labels on the board rather than describing them from across the room. A small card or folded index card with the words nut-free or dairy-free next to that group does more work than a sentence in conversation.
Replenish in small portions. When the cheese area thins out, add two slices rather than a whole new handful; when the cracker pile disappears, restack rather than refill. Restocking in small amounts keeps the board looking full for the two hours it is out, and it stops you from over-buying in the first place.
Keep the cold items cold. Put out the meats and cheeses in small batches and return the rest to the refrigerator between trips to the kitchen, or set the surface over ice packs. Use the two-hour rule and the one-hour rule above as your hard limit for perishable food at room temperature, and do not extend it because the guests are still eating.
Remove perishable items within the safe window and follow the package’s storage instructions. Cheeses usually keep a while refrigerated in their original packaging; sliced deli-style meat keeps far less time in the open air than in the package, so eat it first. Nuts, crackers, dried fruit, unopened jars and whole pickles are the items that will still be fine days later, which is the practical argument for putting your budget into them rather than into more cheese.
For cleanup, pull everything off, scrape the surface, and wash the board with hot soapy water. Do not drop a wood board in the dishwasher, and dry it upright rather than flat so it does not hold water against the grain. Wash the bowls and utensils the same way you would any other food contact surface, and store the board in a dry cabinet away from the stove where it can pick up moisture.
You will know this step worked if the board comes back clean, dry and odor-free, and if nothing perishable stayed out past its window.
Common Mistakes
Buying specialty items first. The imported triple-creme wheel is the single most common way a 30-dollar board turns into a 50-dollar board. Fix: buy ordinary hard cheeses, buy them in blocks, and spend the money you saved on a third meat instead, which is more visible per slice.
Overcrowding. Piling food until the board is invisible makes it look smaller, not bigger. Fix: leave visible gaps between groups, and remember that guests move items themselves. Negative space is free.
Only one texture. A board of soft items plus crackers looks beige and flat. Fix: commit to four textures, soft, hard, crisp and creamy, and make sure each one is on the board before you start arranging.
Forgetting utensils. No tongs, no forks, and guests pick with their hands, which means less food goes on plates and more of it ends up on the carpet. Fix: budget two minutes and three small utensils. They are not part of the food budget.
Too many dips. Four bowls of dip turn a grazing board into a dip plate with some cheese on it. Fix: one savory, one sweet, and let the olives and pickles do the rest of that job from jars you already own.
Leaving perishable food out too long. This is the one mistake that is not a style problem. Fix: bring items out in batches, keep the surface cold, and treat two hours as a limit rather than a guideline.
One last tip that pays for itself: shop your own pantry before the store. A bag of pretzels, a jar of olives, nuts in the freezer or crackers in the back of the cabinet are the cheapest items on any board, and using them first is often the difference between a thirty-dollar board and a twenty-dollar one.
Frequently Asked Questions
How many people can a 30-dollar charcuterie board serve?
A 30-dollar charcuterie board feeds six to eight people comfortably as an appetizer, or four to five if it is the only food on the table. The working math is one to two ounces of cured meat and about one ounce of cheese per guest, plus a handful of crackers and a few pieces of produce. If you are serving twelve, expect four of something rather than six of something, which costs variety rather than volume.
What foods should I buy first when building a charcuterie board on a 30-dollar budget?
Buy in this order: two hard cheeses and one soft or goat cheese, then two pre-packaged cured meats, then produce, then crackers, then one sweet or savory spread. Cheese and meat take roughly 55 percent of the budget, so choosing them carefully sets the ceiling for everything else. Add olives, nuts and dried fruit last because they are the cheapest items on the board and the ones that add the most visual volume.
Can I make a charcuterie board without a special wooden board?
Yes, and most first-time hosts do. A rimmed sheet pan, a baking sheet lined with parchment, a large cutting board, a wide dinner platter or even a clean pizza board all work. What matters is that the surface is food-safe, flat, and has a lip or parchment underneath so juices and crumbs do not run off the edge. Reused jam jars and yogurt cups stand in for bowls.
What are good vegetarian substitutions for a 30-dollar charcuterie board?
Replace the cured meats with roasted nuts, marinated olives, pickled vegetables, dried fruit and extra crackers, and keep the cheese and produce the same. Hummus or another bean spread adds substance in a small bowl. Serve meat-free items in a separate zone with their own utensil so vegetarian guests can reach them without crossing anything shared, and keep nut clusters away from the communal cracker pile.
How long can a charcuterie board sit out safely?
Keep perishable foods at or below 40 degrees Fahrenheit, which is 4 degrees Celsius, and do not leave them at room temperature for more than two hours. If the outdoor temperature is above 90 degrees Fahrenheit, cut that to one hour. Bring meats and cheeses out in small batches and return the rest to the refrigerator between trips to the kitchen. Follow the storage dates and handling instructions printed on each package.
How do I make a budget charcuterie board look impressive?
Height and color do the work, and both are free. Fold sliced meat into ribbons or simple rosettes, stand crackers upright in a jar, curl soft cheese instead of laying it flat, and group every item in its own place rather than letting foods touch. Aim for six or more distinct groups, at least three colors, and visible gaps between them. A few fresh herb sprigs tucked between the cheese groups finish it off.
Conclusion
A 30-dollar charcuterie board is a matter of proportions and build order, not premium ingredients. Spend about a third on cheese and a quarter on cured meats, spend the rest on produce, crackers, one spread, a sweet accent and cheap fillers, and assemble in a fixed sequence: bowls first, cheeses as anchors, folded meats between them, crackers and produce filling the gaps, garnishes last.
Start with one protein, two cheeses, two fruits or vegetables, crackers, one spread and whatever herbs you have, then arrange them in separate groups rather than overspending on specialty items. Fold the meat, stand the crackers, and check the receipt before you leave the store.